Showing posts with label Dining Hall. Show all posts

Dining Hall: Oversized Stitches

Azure Kite, Balmung, and Orca from .hack//GU. Image:www.rpgamer.com

Detail of Maria Renard, Castlevania Judgment. Image: castlevania.wikia.com
I’ve seen this effect done a few different ways, most recently and popularly with the character Dr. Stein from Soul Eater. Some cosplayers cut the fabric and use the oversized stitching to keep the garment together, and some cosplayers cut the fabric apart, stitch it back together again, and then the oversized stitching is decorative.

If you want the disconnected effect of the first technique but also want the strength of the second, then lining or partial lining is your friend. After cutting the garment apart along the desired lines, finish the fabric with either an overlocked edge or a tiny hemmed edge. For a frayed effect, run the edge between the nails on your thumb and index finger to separate the fibers, and then use Fray Check. If the fabric is polyester, you can even burn the edge because the fibers will fuse together. Do this in an area with proper ventilation since burning plastic does give off some nasty, hazardous fumes.

If you are using lining, then pin the two sides in place (here’s where you get to decide how much space you want between the two pieces of fabric) and with thread matching the top layer of fabric, stitch very close to the cut edge so that the seam is nearly invisible. On the other hand, if you are using a partial lining or just an insert of fabric underneath the seam, first determine if the insert can be seen through the top layer of fabric. Once you’ve determined that it cannot, then make sure that this layer is securely pinned in place as well as the top layers, as described above.

After this, proceed to use your preferred ‘thread’ for the oversized stitches. I like narrow bias tape because it looks finished and its lies flat well. Just make sure to use Fray Check or a similar product on the holes you create for the ‘thread’ if there aren’t grommets, so that the garment doesn’t become any more distressed than it needs to be!

Dining Hall: Decomposing Armor

Armor doesn’t really rot. But if you want to give armor a decomposed, organic texture befitting a ghast from another plane, then give this a shot.

After you have made your armor but before giving it a finish (I used the craft foam method for this), take a bag of cotton balls, a bottle or two of Fabric-Tac, and find somewhere very well ventilated.

Working on one piece at a time, coat each surface liberally with Fabric-Tac. It does not have to be an even coat, as long as the surface is covered. However, it’s important not to use so much that the Fabric-Tac is dripping off.

Cotton balls tend to peel apart into long strands of cotton if you find the right place to start pulling. Do not pull the cotton ball apart beforehand, but keeping this face in mind, drag the cotton ball across the Fabric-Tac. The Fabric-Tac should catch onto the cotton ball and the fibers should stick, giving the armor a very uneven surface. There should be some cotton on every visible space, but the thickness should not be more than a quarter of an inch or so.

When the surface is covered, go over with a lighter top coat of Fabric-Tac or Tacky Glue. Allow this to dry. Afterwards, use the paint or finishing product of your choice to give your armor a metal-like or, conversely, organic appearance. I used spray paint, allowed it to dry, and followed up with rub’n’buff before giving it a final protective coat. Since it’s Halloween, don’t forget to take advantage of the uneven surface to show wear and age!

Dining Hall: HUGE Appliques

Sometimes the pretty details that catch our attention are kind of big for 'details'. Really big. This is part one of a tutorial that outlines the process of transforming a very large design from the original artwork...


This art is property of CLAMP. Read Tsubasa Reservoir Chronicles!

...into real life.
Note: the example photos for this tutorial are for a different costume than the one shown above.


1. Don’t do this on the original pattern for your garment. You will need it in part two of this tutorial. Instead, make a copy. Here, the kind of pattern paper that resembles interfacing is shown.


I don’t actually recommend this type of pattern paper for designing appliqués. It catches on mostly everything—pencils, pens, etc.—making it incredibly difficult to draw smooth curves. You can’t erase, and it doesn’t absorb very well, so markers will smudge and smear. And because it’s so thin, more often than not, I found myself ripping holes in the paper. Instead, use brown parcel paper, Swedish tracing paper, or even newspaper. If it’s a symmetrical pattern, I especially recommend the Swedish tracing paper because its transparency will allow you to easily copy one side over to the other.


2. It's helpful to sketch out the overall pattern on a piece of paper first. Even if it’s just a rough guess of what the final design will be, it’s a good way to get your thoughts organized.
If you’ll notice, the board I have underneath has a grid. If you’re still new to drafting designs on a large scale, don’t be afraid to sketch grid lines onto the paper to help keep things in proportion. Since this is a cloak, I have very faint lines in a grid radiating from the center on the full-size pattern.


3. If you have another piece overlapping the design, make sure to note its position in relation to the appliqué. This will also help the transition from the smaller sketch to the pattern paper. Also mark the seam allowance, so your design doesn’t go onto an area that won’t be seen.


The pink and yellow pattern here is the overlapping piece. The green dashes mark where it sits on the garment that this applique will be sewn onto.

3. I sketch things out in pencil before going over with marker. That way, I can see what translates form the smaller sketch to the full-size design, what needs to be altered, if things can overlap and whatnot, before having the final line.


4. If your appliqué is mostly symmetrical but with asymmetrical detail in the middle, then go ahead and copy over the symmetrical parts of the design before working on the middle. That way, you won’t accidentally design over another part of the appliqué.


5. Remember when I mentioned that it would be good to note where any overlapping pieces would fall on the appliqué? More than likely, the reference art doesn't show what’s going on under that overlapping piece, but that doesn’t mean you shouldn’t put anything there. Unless that overlapping piece is basted down on top of the piece this appliqué will be sewn onto, people will see that mystery area and it will look weird if there isn’t anything there. Luckily, you’ve just been copying a huge design for the past half an hour, so you have a pretty good handle over the original art style.
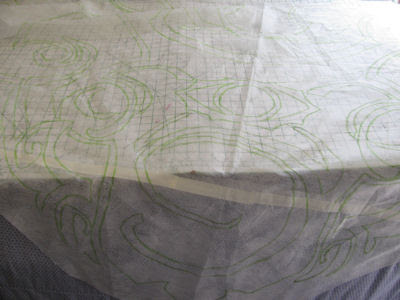


And here’s the final product! Or a part of it, anyways (my working area is about two feet longer than the garment.) Coming soon: how to transfer that crazy design onto the fabric.

Dining Hall: That Super-Fancy Encrusted Gems Effect

Sometimes artists, like Yoshitaka Amano, give this sort of cloudy texture to a piece of the costume and that particular piece doesn’t look like fabric. It’s something weird, like a shoe buckle. Instead of spending a ridiculous amount of money on a fancy buckle that doesn’t really look accurate (but is expensive), try this.

Buy a bunch of shiny seed beads in the color you need and pour them out on a paper plate. Find a nice, cheap and plain version of, say, that belt buckle. Coat the area you need decorated with E6000 (please do this outside with proper ventilation and safety precautions) and dip.

After your item is covered, coat the beaded surface with polyurethane and leave them somewhere nice, like your garage, to dry out.

I like to add a few seed beads that are lighter and darker to give this effect more depth. Also, you can buy undrilled miniature gemstone chips and do the same thing if you’re looking for a different texture than seed beads can provide.

Looking for something?


My name is greyrondo. I've been a cosplayer since Fall 2006, and I've noticed that the best conversations I have with cosplayers usually involve the question, 'so how DID you do that?'

So after studying costuming and making a closet's worth of costumes, that's what I'd like to help answer. Drop in and stay awhile whether you're a cosplayer or just a curious spectator; one of my musings is bound to be what you're looking for.

If you have a question or something to say, leave a comment or contact me! I don't bite, I promise.