As much as I warn people to stay far, far away from the ‘costume’ fabrics aisle at Joanns and as much as the sight of a Party City wig makes me cringe, Halloween can be a good time of year to do some cosplay shopping. When else can you find ridiculously huge plastic chains for that oversized sword prop, already pre-painted and weathered, for 40% off?
If you’re the kind who plans way ahead on their costumes, Halloween can potentially be the most rewarding time of the year (apart from Coupon Commotion Week at Joanns, maybe) depending on what kind of costume you have slated. Some things, like fake blood, fake teeth, etc., are simply easier to find at this time of year. For example, I have a silver cream makeup tube that I bought at (gasp!) Party City. After trying a few different techniques, it really does the best job of making my eyebrows appear silver whenever I cosplay Kuja. Especially if you happen to live near a costume shop already, the items that appear in stock will likely be more than just bottom-of-the-line, low-quality materials.
Of course, it’s really easy to fall into the trap of ‘well, I need a scythe, and there’s this one right here… it doesn’t look anything like what I need, but it IS right here…’
Just like shopping for materials at any other time of the year, you have to use good judgment. If something isn’t up to standard, no pumpkin stencil on a sale banner is going to make it better.
But if I’m cosplaying Seras Victoria from Hellsing and I need those fangs sooner or later, I can bet now’s a pretty convenient time to go out and purchase them. And I’m all for having one less thing to worry about.
Shopping For Cosplay During Halloween: The Good, The Bad, and the Ugly
Black Butler Diary: Heels of Death
After I saw The September Issue, I was inspired to get back into wearing heels because I do love heels and, at 5’2”, I’m not exactly removing myself from the dating pool if I go a little taller. It’s now the end of September, so I figure that I have plenty of time to work my way from flats to stilettos for March. But I admit, I look a little ridiculous wearing a tanktop, gym shorts, and grey suede knee-high boots with 3” heels.
So… it’s 10:30 in the morning on a Sunday. Why am I doing this, again?
Sometime last week or so, between deciding that Eye Motif Fai would be best for A-kon 2010 and thinking I would like to be sane after completing the costume, I thought it would be nice to pick up a ‘break’ cosplay—someone I could work on when Fai gets to be too much. Someone spunky (because nothing says depressing like a post-Tokyo Fai cosplay), someone who I can have fun with researching the costume period, someone… with a bit of flair. It is fashion week time, after all. What can I say, I miss Kuja!
I was considering a female character just for a change. I looked at the fighting game girls and looked over my anime and manga collection, but no one really stood out. Since I’m super-picky and the character has to have some meaning to me for me to pay attention long enough to finish a costume, I went on a search. What better time to discover new anime and manga than the present, right?
So I started off with Kuroshitsuji, or Black Butler. As everyone knows, Kuroshitsuji is what would happen if Hellsing and Yami no Matsuei had a one-night stand, left Yami no Matsuei to raise the child, named him Artemis Fowl, and put him in a dress.
We all know where this is going. My criteria were 1) someone who it would be fun instead of depressing to be in character as for an extended period of time, and 2) someone vaguely fashionable for the series, and 3) Someone who I could cosplay solo without feeling weird. Enter Grell Sutcliff.
Of course, I couldn’t just pick someone and go. I had to run this by my friend (aka sanity meter) first.
Her: HOLY FUSS. WHY ARE YOU NOT DOING THIS ONE? SHE'S, LIKE, KUJA'S AND FAI'S EVIL DAUGHTER. (creeped out, btw, very creeped out)
Me: That’s a boy.
Her: ...it's a he?! *goes and stares at the pic*
Forget the chainsaw, these heels will be my death.
Dining Hall: HUGE Appliques
Sometimes the pretty details that catch our attention are kind of big for 'details'. Really big. This is part one of a tutorial that outlines the process of transforming a very large design from the original artwork...

This art is property of CLAMP. Read Tsubasa Reservoir Chronicles!

1. Don’t do this on the original pattern for your garment. You will need it in part two of this tutorial. Instead, make a copy. Here, the kind of pattern paper that resembles interfacing is shown.
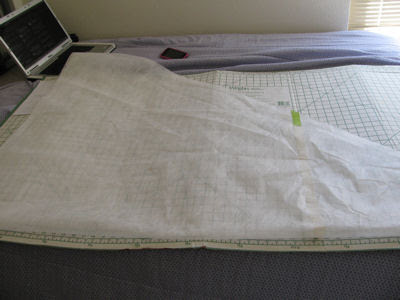
I don’t actually recommend this type of pattern paper for designing appliqués. It catches on mostly everything—pencils, pens, etc.—making it incredibly difficult to draw smooth curves. You can’t erase, and it doesn’t absorb very well, so markers will smudge and smear. And because it’s so thin, more often than not, I found myself ripping holes in the paper. Instead, use brown parcel paper, Swedish tracing paper, or even newspaper. If it’s a symmetrical pattern, I especially recommend the Swedish tracing paper because its transparency will allow you to easily copy one side over to the other.
2. It's helpful to sketch out the overall pattern on a piece of paper first. Even if it’s just a rough guess of what the final design will be, it’s a good way to get your thoughts organized.
If you’ll notice, the board I have underneath has a grid. If you’re still new to drafting designs on a large scale, don’t be afraid to sketch grid lines onto the paper to help keep things in proportion. Since this is a cloak, I have very faint lines in a grid radiating from the center on the full-size pattern.
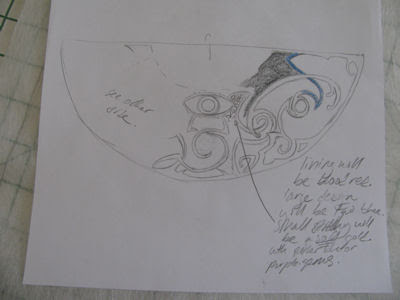
3. If you have another piece overlapping the design, make sure to note its position in relation to the appliqué. This will also help the transition from the smaller sketch to the pattern paper. Also mark the seam allowance, so your design doesn’t go onto an area that won’t be seen.

3. I sketch things out in pencil before going over with marker. That way, I can see what translates form the smaller sketch to the full-size design, what needs to be altered, if things can overlap and whatnot, before having the final line.
4. If your appliqué is mostly symmetrical but with asymmetrical detail in the middle, then go ahead and copy over the symmetrical parts of the design before working on the middle. That way, you won’t accidentally design over another part of the appliqué.
5. Remember when I mentioned that it would be good to note where any overlapping pieces would fall on the appliqué? More than likely, the reference art doesn't show what’s going on under that overlapping piece, but that doesn’t mean you shouldn’t put anything there. Unless that overlapping piece is basted down on top of the piece this appliqué will be sewn onto, people will see that mystery area and it will look weird if there isn’t anything there. Luckily, you’ve just been copying a huge design for the past half an hour, so you have a pretty good handle over the original art style.
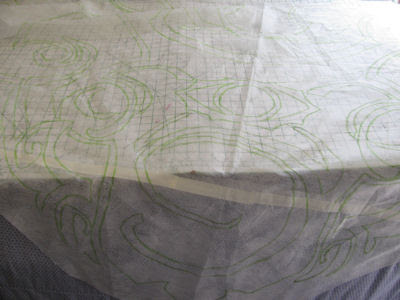
And here’s the final product! Or a part of it, anyways (my working area is about two feet longer than the garment.) Coming soon: how to transfer that crazy design onto the fabric.
Quick Doodles: Swatch it Out
Sometimes, you can’t buy all of your fabric at once. Or you didn’t buy enough the first time around. Maybe you found an old remnant that will work perfectly for your new costume, but you need to match the color.
Because these things happen, it’s incredibly important to bring swatches with you not only when you go fabric shopping, but even when shopping for clothes to alter, beads, and accessories.
What is a swatch? A swatch is a ‘little’ sample of fabric used to facilitate the exhausting process of matching color, pattern, or texture. They also help out with testing fabric quality and more.
How big should a swatch be? I like for my swatches to be big enough to cover a not insignificant portion of my palm. Sometimes the swatches that fabric stores provide (do not be afraid to ask for a swatch!) are not big enough for my liking, but when you’re cutting swatches from your own fabric, do your eyes a favor and cut the swatch on the larger size. This will make it easier to compare color, fabric composition, etc.
If you are buying fabric online, be sure to plan ahead enough to allow time to order swatches. No computer screen can substitute for feeling and seeing the fabric in front of you (and you can’t throw your monitor in the washing machine to see if the dye bleeds!)
Quick Doodles: Beads and Such
Pet Peeve: beads that come in multicolor packages.
I don’t have anything against the fun packs of beads you can pick up at Walmart or even Hobby Lobby. But when I’m going out of my way (a.k.a. going online to a specific store) to find a specialty bead with a distinct sheen, shape, material, whatever, nothing ticks me off more than finding that bead only comes in silver or gold, and then mixed multicolor—to me, totally random—packs.
This is because if I’m cosplaying, chances are that the character has a very specific color, say… green. Green isn’t random. Not random at all. And cosplay is such an expensive endeavor, it's not fun to hand over your money and only get 1/10 of it back.
Also. In the catalogues, the price is usually what I see first. So if I see an awesome amount of beads for an incredible price, I get excited. Then I see that they’re mixed or multicolor, and I get sad. It happens.
Quick Doodles: Getting Your Seam Allowance Right
When I was a little girl and I absolutely hated to sew, my mom taught me how to sew on the Singer that eventually became such a pain that we traded it in for an Elna.
But while I was learning to sew, my mom made me use a seam gauge. In my experience with sewing, I have run into two kinds: one that screws onto the machine itself, and one with a very powerful magnet that is placed up against whatever seam allowance is called for.
Being tight-budgeted cosplayers, I know that everyone is asking the same question: is it worth the money? If you’re a beginner, maybe.
The magnet seam guide that I talked about is made by Dritz and costs maybe five bucks at the most. Like the screw-in seam gauge, it works by providing a physical barrier that keeps the fabric, ideally from moving past a certain point. But what I’ve noticed is that if a beginner (I did this too) has a tendency to press fabric too far to the right of the seam allowance, the fabric nestles up against the barrier that seam gauges and guides create, sometimes allowing a situation in which the needle sews this second layer over the first. And when I was a beginner, I remember that ripping out my seams and starting over from scratch ticked me off more than anything.
If you’re learning how to sew and you do the same thing I did, use the guides marked on the plate or, if necessary, place the edge of a piece of tape along the desired seam allowance. Don’t get too crazy with the pedal, and go slow. There’s plenty of time to go fast when you have more control over your machine.
Dining Hall: That Super-Fancy Encrusted Gems Effect
Buy a bunch of shiny seed beads in the color you need and pour them out on a paper plate. Find a nice, cheap and plain version of, say, that belt buckle. Coat the area you need decorated with E6000 (please do this outside with proper ventilation and safety precautions) and dip.
After your item is covered, coat the beaded surface with polyurethane and leave them somewhere nice, like your garage, to dry out.

I like to add a few seed beads that are lighter and darker to give this effect more depth. Also, you can buy undrilled miniature gemstone chips and do the same thing if you’re looking for a different texture than seed beads can provide.
