Dining Hall: Oversized Stitches

Azure Kite, Balmung, and Orca from .hack//GU. Image:www.rpgamer.com

Detail of Maria Renard, Castlevania Judgment. Image: castlevania.wikia.com
I’ve seen this effect done a few different ways, most recently and popularly with the character Dr. Stein from Soul Eater. Some cosplayers cut the fabric and use the oversized stitching to keep the garment together, and some cosplayers cut the fabric apart, stitch it back together again, and then the oversized stitching is decorative.

If you want the disconnected effect of the first technique but also want the strength of the second, then lining or partial lining is your friend. After cutting the garment apart along the desired lines, finish the fabric with either an overlocked edge or a tiny hemmed edge. For a frayed effect, run the edge between the nails on your thumb and index finger to separate the fibers, and then use Fray Check. If the fabric is polyester, you can even burn the edge because the fibers will fuse together. Do this in an area with proper ventilation since burning plastic does give off some nasty, hazardous fumes.

If you are using lining, then pin the two sides in place (here’s where you get to decide how much space you want between the two pieces of fabric) and with thread matching the top layer of fabric, stitch very close to the cut edge so that the seam is nearly invisible. On the other hand, if you are using a partial lining or just an insert of fabric underneath the seam, first determine if the insert can be seen through the top layer of fabric. Once you’ve determined that it cannot, then make sure that this layer is securely pinned in place as well as the top layers, as described above.

After this, proceed to use your preferred ‘thread’ for the oversized stitches. I like narrow bias tape because it looks finished and its lies flat well. Just make sure to use Fray Check or a similar product on the holes you create for the ‘thread’ if there aren’t grommets, so that the garment doesn’t become any more distressed than it needs to be!

Hall Meeting: When Should I Buy Theatrical Contacts?

Ah, Halloween. That special time of year when your beloved vampire/werewolf/hybrid lover can look into your eyes with those romantic... super creepy... glowing red eyes of his.

Theatrical contacts, while not much more expensive than a long wig for even prescription lenses, are commonly seen as quite an investment that many people opt out of when putting together cosplay. Maybe it’s because you have to go through the trouble of having an updated prescription (even for plano lenses), maybe it’s nearly impossible to get them if you’ve chosen to do a last-minute cosplay, maybe because it’s one more thing added to the budget. So realistically, when should you buy contacts? Here are my conditions for buying contacts.

1) If you’re going to steadily cosplay that character. I have ‘Terran’ blue contacts for Kuja because I will be cosplaying that man for quite some time.
2) If you have a lot of characters with the same altered eye color planned. For some reason, I’ve been attracted to gold-eyed characters lately. Post Tokyo-Revelations Fai Fluorite, Grell Sutcliff, Albireo, and Emperor Fou-lu all have gold eye(s).
3) If having the right-colored eyes is the only way for the make-up/hair/skin tone scheme to work. For the aforementioned Kuja cosplay, those blue eyes locked in the pale skin and silver hair color combination.
4) If that eye color is significant to the plot. If that character has blue eyes just because that’s how the art is, then that’s not so bad. But if your character has blue eyes that glow like toxic waste because he was pumped full of Jenova’s DNA, then you should invest in contacts.

In general, if you can fit the contacts into your budget, there is no reason to not plan ahead of time and order them. For me, they make a huge difference in how in character I will be. At a convention, I’ll turn off being in character to do something like… walk into the women’s restroom, take a breather to check my phone, readjust my wig and reapply my man-lipstick. All I have to do is look in the mirror. Just having an eye color different from my own (not too many hazel brown-eyed characters in the world of anime) gets me back in character. It’s pretty handy.

Dining Hall: Decomposing Armor

Armor doesn’t really rot. But if you want to give armor a decomposed, organic texture befitting a ghast from another plane, then give this a shot.

After you have made your armor but before giving it a finish (I used the craft foam method for this), take a bag of cotton balls, a bottle or two of Fabric-Tac, and find somewhere very well ventilated.

Working on one piece at a time, coat each surface liberally with Fabric-Tac. It does not have to be an even coat, as long as the surface is covered. However, it’s important not to use so much that the Fabric-Tac is dripping off.

Cotton balls tend to peel apart into long strands of cotton if you find the right place to start pulling. Do not pull the cotton ball apart beforehand, but keeping this face in mind, drag the cotton ball across the Fabric-Tac. The Fabric-Tac should catch onto the cotton ball and the fibers should stick, giving the armor a very uneven surface. There should be some cotton on every visible space, but the thickness should not be more than a quarter of an inch or so.

When the surface is covered, go over with a lighter top coat of Fabric-Tac or Tacky Glue. Allow this to dry. Afterwards, use the paint or finishing product of your choice to give your armor a metal-like or, conversely, organic appearance. I used spray paint, allowed it to dry, and followed up with rub’n’buff before giving it a final protective coat. Since it’s Halloween, don’t forget to take advantage of the uneven surface to show wear and age!

Black Butler Diary: The Hapless Butler

So I might or might not have been freaking out about Grell’s shoes for the past few days. Once I saw red oxfords, I really, really wanted to have red shoes for him instead of black and white oxfords or plain black oxfords. The two pairs of red oxfords I found were respectively 1) out of stock and 2) made out of such obviously synthetic materials that they would never fit the late Victorian era.

So with all the enthusiasm of a Facebook stalker, I’ve been checking ModCloth.com’s new stock every day, because that’s how quickly some items can sell out on that website. I came across this pair, which I liked better than the heels I had seen previously because it goes up higher on the foot, has more buckle details, and look more old-fashioned. Except they were in white, not the desired red.

I’ve spent the past two months dyeing stuff for class instead of having a social life. Apart from fabric, you can dye anything—wood, shells, bone, even acrylic beads. So why did it take me so long to remember that you can dye shoes?

Instant Noodles: Post-Apocalyptic Angel Wings

Today is October 1st, and you know what that means! It's time to start thinking about Halloween. This entire month, my how-to posts will focus on distressing, blood, and everything downright creepy.

Day One: Post-Apocalyptic Angel Wings

Angels don’t always look all pure and pretty, as everyone knows. But if you’re bored with simply trading out the white feathers for black, try this.

Cut out your feathers from newspaper. That’s right: newspaper. Use sections with a lot of text, because nothing ruins the effect like having Garfield on your wings. Crumple each feather and then flatten, and then coat liberally with craft polyurethane, like the kind you would use as a final protective coat on a sword. Here’s one of the few cases where it’s better to use the polyurethane that turns yellow when it dries. Allow the polyurethane to drink completely, and then use these feathers when making your angel wings.

What the polyurethane does with the newspaper is that it both yellows the newspaper to look like it’s been aged, gives it a creepy oily sort of sheen, and it makes it slightly transparent so that you can halfway see both sides of the print. Because this makes the paper brittle, I don’t recommend stapling down or stitching them to the wing structure. This is one instance where glue works just fine.

Shopping For Cosplay During Halloween: The Good, The Bad, and the Ugly

As much as I warn people to stay far, far away from the ‘costume’ fabrics aisle at Joanns and as much as the sight of a Party City wig makes me cringe, Halloween can be a good time of year to do some cosplay shopping. When else can you find ridiculously huge plastic chains for that oversized sword prop, already pre-painted and weathered, for 40% off?

If you’re the kind who plans way ahead on their costumes, Halloween can potentially be the most rewarding time of the year (apart from Coupon Commotion Week at Joanns, maybe) depending on what kind of costume you have slated. Some things, like fake blood, fake teeth, etc., are simply easier to find at this time of year. For example, I have a silver cream makeup tube that I bought at (gasp!) Party City. After trying a few different techniques, it really does the best job of making my eyebrows appear silver whenever I cosplay Kuja. Especially if you happen to live near a costume shop already, the items that appear in stock will likely be more than just bottom-of-the-line, low-quality materials.

Of course, it’s really easy to fall into the trap of ‘well, I need a scythe, and there’s this one right here… it doesn’t look anything like what I need, but it IS right here…’

Just like shopping for materials at any other time of the year, you have to use good judgment. If something isn’t up to standard, no pumpkin stencil on a sale banner is going to make it better.

But if I’m cosplaying Seras Victoria from Hellsing and I need those fangs sooner or later, I can bet now’s a pretty convenient time to go out and purchase them. And I’m all for having one less thing to worry about.

Black Butler Diary: Heels of Death

After I saw The September Issue, I was inspired to get back into wearing heels because I do love heels and, at 5’2”, I’m not exactly removing myself from the dating pool if I go a little taller. It’s now the end of September, so I figure that I have plenty of time to work my way from flats to stilettos for March. But I admit, I look a little ridiculous wearing a tanktop, gym shorts, and grey suede knee-high boots with 3” heels.

So… it’s 10:30 in the morning on a Sunday. Why am I doing this, again?

Sometime last week or so, between deciding that Eye Motif Fai would be best for A-kon 2010 and thinking I would like to be sane after completing the costume, I thought it would be nice to pick up a ‘break’ cosplay—someone I could work on when Fai gets to be too much. Someone spunky (because nothing says depressing like a post-Tokyo Fai cosplay), someone who I can have fun with researching the costume period, someone… with a bit of flair. It is fashion week time, after all. What can I say, I miss Kuja!

I was considering a female character just for a change. I looked at the fighting game girls and looked over my anime and manga collection, but no one really stood out. Since I’m super-picky and the character has to have some meaning to me for me to pay attention long enough to finish a costume, I went on a search. What better time to discover new anime and manga than the present, right?

So I started off with Kuroshitsuji, or Black Butler. As everyone knows, Kuroshitsuji is what would happen if Hellsing and Yami no Matsuei had a one-night stand, left Yami no Matsuei to raise the child, named him Artemis Fowl, and put him in a dress.

We all know where this is going. My criteria were 1) someone who it would be fun instead of depressing to be in character as for an extended period of time, and 2) someone vaguely fashionable for the series, and 3) Someone who I could cosplay solo without feeling weird. Enter Grell Sutcliff.

Of course, I couldn’t just pick someone and go. I had to run this by my friend (aka sanity meter) first.

Her: HOLY FUSS. WHY ARE YOU NOT DOING THIS ONE? SHE'S, LIKE, KUJA'S AND FAI'S EVIL DAUGHTER. (creeped out, btw, very creeped out)

Me: That’s a boy.

Her: ...it's a he?! *goes and stares at the pic*

Forget the chainsaw, these heels will be my death.

Dining Hall: HUGE Appliques

Sometimes the pretty details that catch our attention are kind of big for 'details'. Really big. This is part one of a tutorial that outlines the process of transforming a very large design from the original artwork...


This art is property of CLAMP. Read Tsubasa Reservoir Chronicles!

...into real life.
Note: the example photos for this tutorial are for a different costume than the one shown above.


1. Don’t do this on the original pattern for your garment. You will need it in part two of this tutorial. Instead, make a copy. Here, the kind of pattern paper that resembles interfacing is shown.


I don’t actually recommend this type of pattern paper for designing appliqués. It catches on mostly everything—pencils, pens, etc.—making it incredibly difficult to draw smooth curves. You can’t erase, and it doesn’t absorb very well, so markers will smudge and smear. And because it’s so thin, more often than not, I found myself ripping holes in the paper. Instead, use brown parcel paper, Swedish tracing paper, or even newspaper. If it’s a symmetrical pattern, I especially recommend the Swedish tracing paper because its transparency will allow you to easily copy one side over to the other.


2. It's helpful to sketch out the overall pattern on a piece of paper first. Even if it’s just a rough guess of what the final design will be, it’s a good way to get your thoughts organized.
If you’ll notice, the board I have underneath has a grid. If you’re still new to drafting designs on a large scale, don’t be afraid to sketch grid lines onto the paper to help keep things in proportion. Since this is a cloak, I have very faint lines in a grid radiating from the center on the full-size pattern.


3. If you have another piece overlapping the design, make sure to note its position in relation to the appliqué. This will also help the transition from the smaller sketch to the pattern paper. Also mark the seam allowance, so your design doesn’t go onto an area that won’t be seen.


The pink and yellow pattern here is the overlapping piece. The green dashes mark where it sits on the garment that this applique will be sewn onto.

3. I sketch things out in pencil before going over with marker. That way, I can see what translates form the smaller sketch to the full-size design, what needs to be altered, if things can overlap and whatnot, before having the final line.


4. If your appliqué is mostly symmetrical but with asymmetrical detail in the middle, then go ahead and copy over the symmetrical parts of the design before working on the middle. That way, you won’t accidentally design over another part of the appliqué.


5. Remember when I mentioned that it would be good to note where any overlapping pieces would fall on the appliqué? More than likely, the reference art doesn't show what’s going on under that overlapping piece, but that doesn’t mean you shouldn’t put anything there. Unless that overlapping piece is basted down on top of the piece this appliqué will be sewn onto, people will see that mystery area and it will look weird if there isn’t anything there. Luckily, you’ve just been copying a huge design for the past half an hour, so you have a pretty good handle over the original art style.
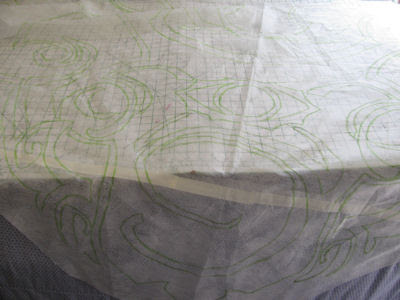


And here’s the final product! Or a part of it, anyways (my working area is about two feet longer than the garment.) Coming soon: how to transfer that crazy design onto the fabric.

Quick Doodles: Swatch it Out

Sometimes, you can’t buy all of your fabric at once. Or you didn’t buy enough the first time around. Maybe you found an old remnant that will work perfectly for your new costume, but you need to match the color.

Because these things happen, it’s incredibly important to bring swatches with you not only when you go fabric shopping, but even when shopping for clothes to alter, beads, and accessories.

What is a swatch? A swatch is a ‘little’ sample of fabric used to facilitate the exhausting process of matching color, pattern, or texture. They also help out with testing fabric quality and more.

How big should a swatch be? I like for my swatches to be big enough to cover a not insignificant portion of my palm. Sometimes the swatches that fabric stores provide (do not be afraid to ask for a swatch!) are not big enough for my liking, but when you’re cutting swatches from your own fabric, do your eyes a favor and cut the swatch on the larger size. This will make it easier to compare color, fabric composition, etc.

If you are buying fabric online, be sure to plan ahead enough to allow time to order swatches. No computer screen can substitute for feeling and seeing the fabric in front of you (and you can’t throw your monitor in the washing machine to see if the dye bleeds!)

Quick Doodles: Beads and Such

Pet Peeve: beads that come in multicolor packages.

I don’t have anything against the fun packs of beads you can pick up at Walmart or even Hobby Lobby. But when I’m going out of my way (a.k.a. going online to a specific store) to find a specialty bead with a distinct sheen, shape, material, whatever, nothing ticks me off more than finding that bead only comes in silver or gold, and then mixed multicolor—to me, totally random—packs.

This is because if I’m cosplaying, chances are that the character has a very specific color, say… green. Green isn’t random. Not random at all. And cosplay is such an expensive endeavor, it's not fun to hand over your money and only get 1/10 of it back.

Also. In the catalogues, the price is usually what I see first. So if I see an awesome amount of beads for an incredible price, I get excited. Then I see that they’re mixed or multicolor, and I get sad. It happens.

Quick Doodles: Getting Your Seam Allowance Right

When I was a little girl and I absolutely hated to sew, my mom taught me how to sew on the Singer that eventually became such a pain that we traded it in for an Elna.

But while I was learning to sew, my mom made me use a seam gauge. In my experience with sewing, I have run into two kinds: one that screws onto the machine itself, and one with a very powerful magnet that is placed up against whatever seam allowance is called for.

Being tight-budgeted cosplayers, I know that everyone is asking the same question: is it worth the money? If you’re a beginner, maybe.

The magnet seam guide that I talked about is made by Dritz and costs maybe five bucks at the most. Like the screw-in seam gauge, it works by providing a physical barrier that keeps the fabric, ideally from moving past a certain point. But what I’ve noticed is that if a beginner (I did this too) has a tendency to press fabric too far to the right of the seam allowance, the fabric nestles up against the barrier that seam gauges and guides create, sometimes allowing a situation in which the needle sews this second layer over the first. And when I was a beginner, I remember that ripping out my seams and starting over from scratch ticked me off more than anything.

If you’re learning how to sew and you do the same thing I did, use the guides marked on the plate or, if necessary, place the edge of a piece of tape along the desired seam allowance. Don’t get too crazy with the pedal, and go slow. There’s plenty of time to go fast when you have more control over your machine.

Dining Hall: That Super-Fancy Encrusted Gems Effect

Sometimes artists, like Yoshitaka Amano, give this sort of cloudy texture to a piece of the costume and that particular piece doesn’t look like fabric. It’s something weird, like a shoe buckle. Instead of spending a ridiculous amount of money on a fancy buckle that doesn’t really look accurate (but is expensive), try this.

Buy a bunch of shiny seed beads in the color you need and pour them out on a paper plate. Find a nice, cheap and plain version of, say, that belt buckle. Coat the area you need decorated with E6000 (please do this outside with proper ventilation and safety precautions) and dip.

After your item is covered, coat the beaded surface with polyurethane and leave them somewhere nice, like your garage, to dry out.

I like to add a few seed beads that are lighter and darker to give this effect more depth. Also, you can buy undrilled miniature gemstone chips and do the same thing if you’re looking for a different texture than seed beads can provide.

Quick Doodles: Cosplayer’s Eye

This is not a disease that can spread from person to person with direct contact or ‘exchanging bodily fluids’, and some people find it easier to embrace this and call it a ‘condition’ rather than a disease.

If you find yourself immediately mentally drafting a piece list for any character art you lay eyes on, even if you have no intention of ever cosplaying that character, then you’re one of the infected. There is no cure.

Other symptoms include, but are not limited to:

1. On sight, matching a garment in a store with a random character from the last manga you read.
2. After looking at a piece of fabric, you can immediately think of at least two different characters that you could use it for.
3. Instantly dismissing an innocent bolt of fabric you aren’t even interested in because it would look terrible photographed.
4. Judging the quality of hairpieces on MTV and VH1.

Even if you are infected, you can find comfort in the knowledge that many cosplayers who have contracted ‘cosplayer’s eye’ continue to experience long, fulfilled and enriched lives, even if they do take longer to go shopping for shoes than ordinary because they are so easily distracted, or... 'focused'.

Quick Doodles: Washing and Steaming

Please wash or steam. I’m thinking about you. If you think that your fabric feels gross when you run your hands over it, your rash is going to feel disgusting when you spend an entire air conditioning-deprived convention with the preservatives, over-saturated dye, and sizing that kept your fabric company on the lonely, bug-infested cruise from China.

Bulletin Board: San Japan

If you are in Texas and you are a cosplayer, you should seriously consider attending San Japan. It's not a large convention, I'll give it that, and for walking the halls, you'd be better off limiting yourself to only the most breathable of your costumes because you do spent a great deal of time outside and the dealer's room/artist's alley areas are quite stuffy.

I just returned from this convention. Many of the panels are cosplay-related, geared towards construction and presentation. If you really wanted to, you could practically spend the entire convention doing nothing but cosplay activities.

(And who can resist a photoshoot on the non-commercial section of the Riverwalk?)

Hall Meeting: Guest Lecturer!

Watch as Sea Lion-sensee demonstrates improper convention behavior:

1) no inappropriate glomping

2) no disturbing others with random shouting

3) no pushing and shoving!

(This movie belongs to me.)


Hall Meeting: My Real Name

Let’s flash back to Anime Matsuri 2. I’m working the game room, making sure everyone is being nice and civil when beating each other to a pulp in SSBM. And I’m wearing Duo Lon from King of Fighters, because I needed another costume last minute and it had to fit both the gaming theme and my tastes in cosplay.

You are doing the game room thing. And you ask for my name. How nice. So I tell you: greyrondo. You have a creepy kind of look in your eye and you sound really sleazy when you ask for my real name.

I fork it over, wondering if possibly you’re new to this whole thing and you’re uncomfortable with the concept of a cosplay name. When in reality, no. You’re just a creeper.

Unless I have struck up a long conversation with you and I intend to speak with you after this convention, if you ask for my name in costume, I will tell you greyrondo. If you ask me outside of costume, I will likely tell you my birth name.

What’s the difference? Giving you my cosplay name will give you a way to find me on the forums and is much easier than printing ‘business’ cards. When I’m in costume, telling you my real name is ridiculous. No one recognizes me out of costume. Ever. I have stared people in the face. I have embarrassingly waved at people in packed restaurants and made a fool out of myself.

And they still didn’t recognize me.

Quick Doodles: What Do I Do Now?

Now is a dangerous time for me. My costume for both San Japan and Nan Desu Kan is done. I have nothing to do. And I can’t do anything right now, for the sake of a) my wallet and b) the fact that I’m moving back up to school in a week (which is why I’m using the same costume for two conventions.)

This is dangerous because I really, really want to make a costume right now. So I’ll tell myself, ‘okay, maybe I’ll feel better if I do something like put together a supplies list and leave it at that.’ Which never works.

So next, I’ll latch onto some other character and start seriously considering cosplaying him or her. And I’ll tell myself, okay, give it three days. If you still feel this way in three days, then maybe…

And of course, I do. So I’ll tell myself, ‘well, we’re just going to read the entire series, watch the anime and the OVA, until you stumble across something you hate about this character so you can get this out of your system.’

Because there’s no way that works, I then go off in search of another series to fixate on, one specifically chosen with the idea that I won’t find someone I want to cosplay in it. And surprise, not only have I found my New Favorite Series (OMG optional), I’ve found someone I want to cosplay.

Can the English version of Dissidia please come out already?

Quick Doodles: I Heart Ribbon

I do. Bias and hem tape from the package can only get so bland, and making your own can only get so tedious, before you give up on both. Ribbon, if wide enough, is awesome because it can step in and function perfectly well as tape as long as you do a little bit of ironing beforehand to get the sharp crease. And everyone loves a sharp, finished hem.

Wire ribbon can get a little fussy, though. If the fabric isn’t heavy enough, the ribbon tends to one-up the laws of gravity and make that hem stick out and up. But if that’s what you’re going for, then the wire will help nicely.

Hall Meeting: When Acting in Character Becomes Downright Anti-social

In all my years, I don’t think I have cosplayed a single normal, entirely socially-adjusted character. So I get it. Your character can destroy the world with about as much thought as it takes for me to make a peanut-butter and jelly sandwich. And because your character can do this, he/she/it/all of the above looks down on the rest of society and either says nothing or only opens their mouth to be a jerkface. And because you’re a dedicated cosplayer, you act in character.

Normally, I’d tell anyone who acts in character that they’re awesome for being so committed. But frankly, I don’t want to tell you because you’ll respond with something like, “heh. You humans are dazzled by the most pathetic things. Go drown yourselves in the slime of your own inadequacies.”

If your character is belligerently anti-social, for the love of cosplay, turn it on when you’re posing for a photo or when you’re role-playing. For the rest of the world, just be neutral. People will remember you as the amazing cosplayer who could effortlessly go between their character and real life.

Instant Noodles: Impromptu Sleeve Board

Sleeve boards are really useful for pressing seams on, you guessed it, sleeves. And everyone likes crisply pressed seams!

Warning: this is not one of those DIY projects that are going to be super-awesome and you’ll immediately integrate it into your collection of sewing-related equipment. This is more along the lines of, “I need these seams pressed this time five days ago” emergency.

You need: 1 yardstick and 2 volumes of your choice from Harry Potter, vols. 4-7.

Lay the yardstick perpendicular on your ironing board and put the Boy Who Lived on top. Drape your sleeve on the bit of yardstick that sticks out. Stabilize the yardstick with one hand and iron with the other.

(In a pinch, Harry can be replaced with vampires or hobbits.)

Quick Doodles: Don’t Glomp Me

Please. Don’t look at me like that. Can’t you see all the hand-beading on my sleeves, or for that matter, the fact that I have more skin than fabric going on, especially in an essential area below my waist?

No, I thought I said—

Okay. Ohhh-kay. Um… uh, yeah. I’m glad that Kuja’s your favorite character too.

Don’t glomp me. The fact that you made me feel violated really puts a damper on conversation.

Quick Doodles: Emergency Wig Maintenance

Don’t do it. I see you there, sitting on the floor in front of panel room #2: your wig’s all tangled and your out-of-costume friend has one of those awful hairbrushes with the plastic bubbles on each bristle. Just once, you think. Just once can’t hurt it too bad.

Please, just use your fingers. If you really feel like some combing apparatus is necessary, go steal a plastic fork from the food set-up. Use a pair of chopsticks for all I care. Just don’t—

*sigh*

The Lounge: Matchmaking

There’s a pair of them in practically every series. You know who I’m talking about. They are the two who rack up all the M-rated fanfictions on ff.net, the ones with the most angst per square inch of memory in their brains, and the ones who, by The End, would die if you separated them.

They are also the two who hate each other's guts at first sight.

Isn’t it the best feeling in the world to look back and crack open the first volume, DVD, or cutscene, and watch them trade death-glares when you know full well that they’re great for each other? I imagine that’s what a matchmaker feels like. You see the squabbling couple in front of you and know that with a little dash of apocalyptic chaos, they’ll turn into a match made in heaven (or in a yaoi fic.)

Instant Noodles: Who Owns a Bodkin?


Elastic waistband pants are a nice, comfortable option for cosplay, if applicable. But shoving elastic through its casing is really time-consuming and sometimes impossible without a bodkin.

Who has a bodkin?

If you don’t, use a tip I learned this spring: take two safety pins and use one to attach the end of the elastic to the beginning of the casing. With the other, stick it parallel onto the elastic itself and move the safety pin through. As long as the safety pin fits through the casing, you’ll be done in no time.

Quick Doodles: The Mysteries of Staystitching, Unveiled!

Or, why staystitching isn’t a waste of your life. I spent about two years of my cosplay life in the dark before I figured this out, because prior to my costuming class, I was self-taught and knew nothing about fabric other than woven/knit/doesn’t fray.

When you cut out your fabric, you free it from the selvage edge. This is somewhat less than cool, because it allows the potential for the weave of the fibers to slip this way and that, particularly at the bias or any curves. Staystitching rocks because it keeps this from happening.

So even if you have two days to finish the costume, staystitch where you’re supposed to (in general, that’s along the collar, sleeve, and the hem). It only takes an extra two minutes and you don’t even have to backstitch, I promise.

A Good Fit

Today on a whim, I pulled my old Fai D. Fluorite cloak down from the top shelf of my closet. After almost losing myself in the purposely-oversized cloak, I smiled.

Which got me to thinking: forget what the costume looks like, how does what a costume feels like affect the cosplay experience?

I know cosplayers out there who can put on anything—and I mean anything—and not sweat it. But for me, the feel of the costume affects my plans from the very beginning. It determines what fabric I use, my makeup, and depending on the time of year, what costume I choose to take to the convention (with all those feathers, Trance Kuja can be quite cozy if it’s nippy outside!)

I do this because sometimes, even the good memories and experiences that happened while wearing that costume aren’t enough to overcome the simple impression that the costume leaves behind.

In strange ways, wearing the costume reminds me of the character. My Fai cloak is warm and reassuring so that I could practically fall asleep in it without worry, while my newest Kuja costume gives me the curious impression of being held back and liberated at the same time, thanks to contradictory pieces like the jacket with the tightly-belted front and almost completely open back. But then there’s a costume like my Super Smash Brothers Brawl Marth.

Marth always seemed a bit uptight to me, and that somehow got translated into my costume. Even though I had the chance to use a lot of my favorite materials and the first pair of boots and sword/sheath combo that I’m proud of both belong to my Marth costume, I’ve never worn it. Putting that costume on just made me want to take it off again.

But if you believe xxxHolic (or any craftsperson), then something that you’ve made has a part of yourself in it. So if you’re making something based on an interpretation of someone, then will that interpretation work its way into the physical final product? I don’t see why not.

Hall Meeting: The Other Side of the Lens

If you’ve already taken photographs of cosplayers and you haven’t yet been mauled, then you’re already doing mostly everything right. But here are a few more things to keep in mind to make the cosplayers like you even more (yes, we remember who you are.)

Do ask before you take your photograph. Don’t groan just yet: ‘asking’ can mean different things depending on the context. I won’t hold it against you if you’re the more shy type who looks hopeful and then points to their camera while making eye contact, or if someone else is already taking a photograph and you take a shot yourself without a peace offering.

I feel that this is important because it gives the cosplayer time to prepare. Particularly with cosplayers like myself who wear less rather than more, I feel much more comfortable when you ask before taking the shot. If I hear the shutter noise and I turn around to find you facing me but closing up your camera, I’m going to assume that you were taking a photograph of my backside. If you ask me beforehand, even if it’s your intent to take a picture of say, my wig or some pattern on my skirt, then I’m fine with what otherwise would have seriously peeved me.

If you consider yourself a more serious photographer, please treat the cosplayer well and, if possible, give direction. I’ve known a more serious and famous cosplay photographer or two who will more or less take their shot, demand ‘what other poses have you got?’ and then take their kill and stalk off in search of more, as if their status puts them at the same level as, say, Miranda Priestly of Devil Wears Prada fame (who everyone in the novel secretly hated, I might note.) We both know that you’re going to upload all of these photos to cosplay.com at the end of the weekend, why not take a few more moments to offer assistance and make the photograph look better for both parties?

And for cosplayers: please take the two seconds to acknowledge the people who took your photographs after all is said and done. I like to maintain character and offer a flourished bow with a vampiric smile. Flash a victory sign, a salute… whatever works!

Quick Doodles: But it’s 50% off!!

I hate, more than anything, going into stores like Hobby Lobby or Michaels. Because I see something that reminds me of, say, Yuuko Ichihara or a bauble on an Amano design, and it makes me want to divorce Kuja and spend $300+ dollars on some random costume that I don’t even really like. But it’s sooo perfect, and it’s on saaaallleeeeee….

It’s okay, I tell myself. Do what your D.A.R.E. officer taught you in elementary school. Just say no.

Instant Noodles: I Don’t Have an Overlock/Serger and My Fabric Frays Whenever I Stare at It!

Nothing works quite like an overlock machine, but if you're in a tight spot, then don’t worry. It’s not you, it’s your fabric. If your fabric is fraying like crazy, put away your Fray Check and run the guilty edges through your machine with a zigzag stitch. Problem solved.

Looking for something?


My name is greyrondo. I've been a cosplayer since Fall 2006, and I've noticed that the best conversations I have with cosplayers usually involve the question, 'so how DID you do that?'

So after studying costuming and making a closet's worth of costumes, that's what I'd like to help answer. Drop in and stay awhile whether you're a cosplayer or just a curious spectator; one of my musings is bound to be what you're looking for.

If you have a question or something to say, leave a comment or contact me! I don't bite, I promise.